Sunday 6 December 2015

Bath tea

There is something satisfying about making home-made gifts. Simple ideas can be really effective.

One such example is making bath tea bags. A simple treat to throw in the bath to make it feel and smell more luxuriant.

What you'll need is:

Dried lavender rubbings - large handful
Dried rose petals - large handful
Dried calendula petals - handful
Dried rosemary - small handful

Thin cotton or muslin cut into 6 rounds the size of a side plate.

You'll also need:

Coarse sea salt 6 TBS
*Epsom salts 3 TBS
**Baking soda 1 TBS
Essential oil (5 - 6 drops) 

Mix all ingredients In a large bowl.
Spoon a TBS into the centre of a cut muslin cloth
[*Epsom salts is useful for soothing tired muscles and **baking soda, softens the water and helps to relieve skin irritation.]

Tie up securely with string and store the bags in a sealable container. 
When you draw a bath, drop a bath tea bag into the water and enjoy.

Wrapped and ready for the tree!


My Steller Story for making bath tea has been featured - So exciting- thank you @Stellerstories! 


Saturday 5 December 2015

Winner of #thegatheredandfoundseries IG competition

The results are in for #thegatheredandfoundseries and a winner is chosen! A common theme I can see is that all pics feature elements from nature, the best place to find inspiration!

Well done to @flojoro123 for being selected as the winning entry. (Please DM Tasha on IG with your address so you can receive the beautiful "Oceans necklace".)

Here is what Tasha Wakefield, from Spindrift Collections and who crafted the 'Oceans Necklace' prize, had to say about her choice. 

"It was an extremely hard decision as the entries were all so beautiful, but this one stood out for me. I love the beautiful composition, colours and stillness. It's a wonderful picture and one that instantly caught me eye."

These  entries are some of Tasha's other favourites.

"I loved this one as the natural colours were so fresh and festive and I can almost smell the tea looking at the picture." @ehpyle 


"I love this picture, it's a wonderful composition and I adore the beach finds and muted colours". @petalplum 


"This picture really put me in the festive spirit - again I loved the natural colour palette and use of the lovely sparkling fairy lights." @kim_swanson

"I enjoyed this beautiful flatlay with carefully selected and placed natural items" @annld60

"This one, I enjoyed the beautiful natural festive composition". @bymeeni


Thanks to everyone who joined in #thegatheredandfoundseries and a Big Thank You to Tasha for her exquisitely crafted prize, the "Ocean's Necklace" and for selecting the winner. Head over to Tasha's website Spindrift Collections to see more of her stunning work and the places you can find her. 

- Claudia x

Saturday 28 November 2015

Spanakopita - a delicious summer evening dish

A simple, but tasty dish to serve when you have guests over is spanakopita. There are many variations for you to present it, but the coil is the most conventional. Nadia Lim who promotes 'good food' and who  is a NZ Masterchef winner and My Food Bag owner had a column in a recent NZ Herald, which I attempted.


What you'll need is:
2 chopped onions
1 tablespoon fresh thyme
2 cloves crushed garlic
1 tablespoon brown sugar
2 tablespoon balsamic vinegar
4  eggs - beaten
200 g feta - crumbed
1/3 cup pine cunts (lightly roasted)
1/4 teaspoon salt
1/4 teaspoon  ground black pepepr
350 g frozen spinach (I used silverbeet from my garden)
12 sheets file pastry
50g melted butter
1-2 teaspoons sesame seeds (optional)

Preheat oven to 190 deg C.

Gently fry the onions, garlic and thyme and after 5 minutes add the sugar and balsamic. Fry for a further 5 minutes until caramelised.

Whisk eggs, salt pepper and feta and add roasted pine nuts. 


I lightly cooked the silverbeet and patted dry. If using frozen spinach you need to squeeze out the water using a clean tea towel. 

Chop spinach roughly and add to the egg mixture. 

The most fiddly bit is preparing the filo pastry.

On a clean, dry surface, lay a filo sheet, brush with melted butter and overlap the next sheet over the one edge and once again, brush with butter. Add a 3rd sheet alongside so you have a long, rectangular  buttered filo pastry sheet. Repeat twice, overlaying the first layer with 2 more buttered filo sheets.

Spread the egg and spinach mixture along the one long edge of the buttered sheet and gently roll up the sheet into a long sausage shape.


Carefully transfer the 'sausage' to a round buttered tin and create a spiral shape starting in the middle {which I didn't do ;)} and working around to the outside.

Brush the spiral with more butter or olive oil. Sprinkle sesame seeds if desired

Bake at 190 deg C for 20-25 minutes.

*Note In my recipe I used a width of  only two filo sheets, so the coil is a bit thicker.


Served with salads this is a lovely meal. A tip would be to not over-roast the pinenuts!

Enjoy - Claudia x

Friday 13 November 2015

Gathered and found

There is therapy, I find, in wandering along the shore to the sound of pounding waves, embraced by the ocean's salty, misty air. Finding interesting bits of jetsam washed up and half buried in the sand is an additional pleasure. 

Tasha Wakefield, my latest featured creative, does this for a living. You will find Tasha strolling along the Sydney beaches or in fact, any beach in the world she may be visiting. You may think she's wondering aimlessly on a beach walk, but she is actually carefully scanning the shoreline for signs of shimmering seaglass to collect and repurpose for her jewellery pieces.

Tasha runs the jewellery business, Spindrift Collections, with the philosophy of creating pieces that are ethically sourced, sustainably produced and affordable.
Tasha  uses sea glass in her jewellery designs, creating beautiful muted colours which suit her silver work. She says : 'Beach glass, also known as sea glass or mermaids tears is old discarded glass from bottles and jars, which made their way into the ocean. Over many years the waves, water and salt then naturally smooth the glass down to a beautifully soft and polished finish. I collect and source my beach glass from seashores all around the world, meaning I always have an amazing variety to choose from when making new works. Whether a Spindrift design or a bespoke commission, I always find just the right piece for you.”

To see her stunning work, visit her newly revamped Spindrift website for a peek at her  elegantly designed and made pieces and to find all Spindrift Collections social media locations.

I am so excited to let you know that Tasha’s is offering this beautiful piece 'Oceans Necklace' as a prize. 

This piece represents our five oceans, with four pieces of sea smoothed beach glass and one solid sterling silver piece. To be in to win, please join us for a competition on Instagram.


{Photos by Tasha Wakefield}

To enter, on Instagram:
1. Follow @spindriftcollections & @adiandbert
2. Tag a friend & invite to join
3. Post a NEW pic featuring what you have gathered and found to #thegatheredandfoundseries
The competition is open worldwide and closes at the end of the month, 30 November. Tasha will judge the winning entry.

Wednesday 11 November 2015

A cut above - #thescissorsseries winners!

We have a winner for #thescissorsseries! 

Amy was very efficient, sending the results to me at the weekend, but I was away attending a conference, so sorry for the delay! 

It's been a pleasure watching my feed and seeing all those pairs of scissors taking centre stage in the most creative ways. Without further ado, here they are. Thanks to the lovely Amy for playing along and providing the prizes and all of you who joined in!

Here are Amy's winners with a few words about her choices.

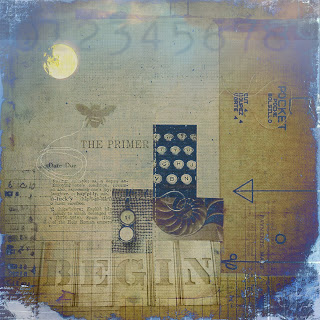
Winner  @kim_swanson receives  print of 'The Primer' and a pair of vintage scissors.


Though this vignette was very simple, the placement of the package, the rosemary and the scissors told the sweetest story. The light in this photo is exquisite and with the elimination of all background shapes, colors and tones, you can appreciate the interplay of these three items and the details - the print on the paper packaging, the embossing on the scissors and even the veins in the leaves of the rosemary are all brought into focus...spectacular!


Runner up - @catrinekelty - receives a print of 'The Primer'.

I'm a firm believer in strength in numbers - especially when it comes to collections. Both of @catrinekelty's photos had a dark, ethereal look to them which played off nicely with the metal of the scissors.  I snickered when I saw the "bouquet" of scissors since I myself always look for interesting ways to photograph the most common of items.


Some honourable mentions

@annld60

@beverlylcazzell_lavenderbleu


Both of these captured a vignette with beautiful arrangement and lighting. 

The depth of field on @annld60 picture is so striking and the complement of the brown bottle to the clear glass as well as picking up the amber tones of the flower bulbs offers great repetition.  The front bottle and the scissors are so clear, you feel like you can reach out and touch them.

Since I have a large collection of sewing paraphernalia, @beverlylcazzell_lavenderbleu  image just spoke to me...and it didn't hurt that it had a ball of string too! Again, with no distractions in the background, the interplay of the tin box, the ball of string, the wooden spools and the scissors is the main focus, all playing perfectly together.

@kraig_at_the_warehouse


@clearerreflections


Gotta give a shout-out to the guys in the group!  Not intimidated by the plethora of roses/peonies/greenery in the submissions, these two offered up a couple of striking images of their own.  Myself being a huge fan of neutrals/grunge/rust/junk, both of these guys usually tug at my heart whenever they post on IG - it was no different with this series.

It really was a difficult process to pick a winner, but the entire series was so enjoyable - I loved seeing all the images come across my feed constantly in the last week, from all around the world - it continues to reinforce for me why IG is by far my favorite creative hangout.  Thanks Claudia for a great week - I hope you enjoyed it as much as I did - you did a fantastic job hosting - thank you!  = Amy Duncan


Kim receives pair of vintage scissors and print of 'The Primer', below, by Amy Duncan and Catrine, as runner up, a copy of the print. Well done!


See you next time.
- Claudia x

Wednesday 28 October 2015

#thescissorsseries Giveaway

After the wonderful response we've had  to Amy Duncan's Four Corners Design feature in Maker Space this week, Amy has suggested a Giveaway of one of her collages! Oh lucky people, this is a goody!

Amy has selected the tag #thescissorsseries which is a perfect tag for a collage artist!

(Photo by Amy Duncan)

But as you know, I like to make you work creatively for the Giveaways I host - so out with your props for this month's challenge!

You could be in to win a print of this beautiful collage by Amy, entitled 'The Primer', as well as a pair of scissors! See entry details below.


Entry details: On Instagram

2. Tag a friend & invite to join
3. Post a NEW pic featuring a scissors theme to #thescissorsseries
Comp is open worldwide  and closes Friday 6 November. Amy will also judge this month's winning entry.

Go on then, get clicking - we are eager to see your entries!

- Claudia x

Monday 26 October 2015

Maker Space - Collage artist, Amy Duncan

It's been a while since I featured an artist and this month I'd like to share the wonderful talent that is Four Corners Design - run by collage artist, Amy Duncan.

Amy has shared some of her inspirations and tricks of the trade with us. To see more of her beautiful works, visit her Instagram page @fourcornersdesign or her website  Four Corners Deign

I asked Amy five questions and here she tells us a little about her art interest and how she puts together her craft.

Thank you Amy, for your time and for sharing your frank reflections. 

Claudia x
(All photos used with permission from Amy Duncan, 2015)
_____________________________________________________________________________


Tell us about how you developed an interest in collage?
            
This really stretched my memory...thinking back to grade school, I always had an interest in art; I even remember winning an art contest and receiving a set of acrylic paints as the prize (which interestingly I never used- I guess I knew from an early age that I wasn’t going to be a painter).  I didn’t pursue much art in high school or beyond because I was more practical and studied math and sciences instead.  I started putting together collages, primarily composed of pictures and ads from magazines while I was in college; in fact I remember making a massive collage that covered most of one wall in my dorm room – I regret having no camera at the time to take a photo to remember the details.  I continued to make more manageable sized collages, often mounted on cardboard, using again magazine images – they always had a theme to them, a thread that ran throughout the photos, tying them all together – I imagine that’s how I selected and composed – according to what the theme was.  I have one of those early collages that I framed and now hangs in my office.  It’s interesting that it incorporates birds and the idea of flight, a theme that’s prevalent in my work to this day, over 30 years later.


Your collages tell stories. How are you inspired to put them together and what approach do you take in laying out the design?
            
It usually starts with snippets of paper or a found object that catches my eye and lights a fire in my imagination – something just clicks – I can’t explain it any other way.  I usually work on more than one collage at a time; when I’m starting out I begin by rummaging through my piles of paper and boxes of junk and pull out pieces that interest me and make a collection.  As I dig further and further, several piles will emerge that have several items in each.  In turn, I look at each pile, determine what I like, what works, what might work.  I often do a dry run of laying out a collage; this helps me to see the relationship between the pieces, what needs tweaking, what can be eliminated, what else I need to complete the picture.  With having more than one collage under construction, things can get moved around and sometimes end up in totally different arrangement than what I originally had in mind – happy accidents can and do occur! 


The library card collage is an example of a piece that was started when I found the library card in a pile – it just sparked a story – and this will most likely get made into an original collage.  The photo of the lady standing next to the card shows first my initial thought of pulling papers/ideas together. 


Here is the finished collage, so you can see that not everything of my original idea ends up in the final collage.


What tips or tricks can you share about the technical aspects of creating collages? ie do you use paper and glue then scan and develop the design electronically?
            
For the most part, I use glue to adhere the paper pieces on to a foundation; which can be a wooden board, an old wood dresser drawer, a fence picket – I’m all about using recycled materials.  Since the paper pieces I am using are essentially recycled (it is rare that I use new materials in my work) I like all the components of the collage be recycled if possible.  In using a solid substrate for my collage foundation, I then can hammer, nail, screw, wire on whatever found objects that I add as the final layer.  I like using glue for paper; I don’t trust it to hold firmly anything of any weight.  Recently I did a series of 10 collages -  I first sewed the collage pieces together (on my trusty Singer sewing machine that is itself a relic!) and then I lightly glued the sewn collages onto a wooden board.  I then used nails and/or tacks to secure the collage in a few strategic places.  I wanted the corners and edges to purposely remain free, enabling them to become folded, bent or torn, emphasizing the concept of the ephemeral nature of the paper scraps that I use.  Much of the paper I use are pieces that are temporary – a used train ticket, a torn envelope, a forgotten receipt...which tell a story if we are willing to listen...

                         
Within the last two years I have been working digitally – I will scan one of my paper collages once it is complete (and before I add any found objects) and then I will combine/merge/layer other photographs that I have taken onto that scan to create a new composition.  I have both the original paper collage and then the new digital collage which allows me to capitalize on an original idea in several different directions.

Below is an example of a paper collage that I finished – The Primer – which I then scanned – and layered four additional photos/layers to create a new, altered piece.


Do you sell your art or work to commissions? If so, how do you stay motivated and keep on track to meet deadlines and do you have a day job as well?
            
I do sell my art – I do about 3-4 area art shows a year as well as having an Etsy shop.  I decided about 15 years ago that I wanted to go back to my artistic yearning of my youth and pursue art seriously.  I had already spent almost 20 years in non-profit management and knew all about living on little money – making the switch to living life as an artist would be pretty much the same!  Unfortunately, I haven’t been able to totally survive on artist wages so I work a part-time retail job that pays the mortgage, but doesn’t tax my mind or energy so I have the mental resources to create.  I stay pretty focused to create every day – some days more productive than others but it's rather second nature to me now.  I’ve always been a planner so when a show is coming up, I know what I need to get accomplished to have a successful show; it helps that I have a variety of goods – original art, prints, and greeting cards.  It’s always nice to sell original art but not everyone can afford it.  I sell a lot of cards at my shows – not a great money-maker, but I have gained followers and they may step up and purchase a more expensive piece in the future.  I have done commission work ... its great when you have freedom in how you approach the work, but it can be limiting as well. There have been times when I just want to get the piece finished, my heart was never in it from the beginning.

What are your creative hopes and dreams?
            
Of course, I would love to be well known enough to have people clamouring for my work at unheard of prices!  But back down to reality...a little more notoriety would be nice; perhaps getting into licensing some of my images.
            
What I do want to pursue is something I started two years ago and has been growing steadily – Art Parties – a gathering of others for the purpose of creating, inspiring and supporting that spark that each of us has...some just need a little more of a nudge than others.  I started offering Art Parties in my workshop studio, pulling in 6-8 others to either learn a new art process, work on a project or just designate creative time where you could come and be with other like-minded creatives – no rules, no judgment, no barriers.  It expanded this October when I co-hosted ArtPartyPortland – a gathering of 14 creative women from around the US for 3 days of art and junking in Portland, Oregon.  I firmly believe that everyone can be creative...and that it doesn’t take expensive supplies or elaborate techniques...you just need a little support, a first step forward...and perhaps a bit of wine...
Thursday 24 September 2015

Bee kind

My love of gardening was nurtured by Granny Mary. Her seaside garden was a treasure trove of nooks and crannies, and an abundance of colour. Little pathways wound up a steep hillside and disappeared into shrubby dead-ends. Enormous boulders were perfect for climbing on and hiding behind. 

Her garden overflowed with plants and ornaments and as children we were captivated by her collection of garden gnomes. Somehow the feeling I experienced of being in her garden has stayed with me. I always tell my family that I feel compelled to be in my garden,  surrounded by the proximity of the smells, colours and tiny details which you cannot experience when overlooking it from the deck above. 

I also remember how noisy Granny Mary's garden was, with bird calls and the buzz of bees - which we ran away from out of fear of being stung.

So it has been with alarm that I've noticed how in the last decade suburban gardens have became monocultures of greenery. Gone are the colourful and bright flower heads gently swaying in the breeze. Gone is the scent that used to drift across the path as you wondered by. Gone are the gardens of the slightly wild and unruly kind. And gone are the bees.

We need these creatures, we do! Their job is essential for pollination so we can grow food. The Ministry of Primary Industries reports that a third of our food is pollinated by bees. But these little creatures are being attacked on all fronts. The varroa mite destroys both wild and hive bees. Also with fewer flowering plants, bees encounter nutritional stress.

So I was delighted to see in the Spring issue of the  NZ Gardener the campaign "It's time for Plan Bee". NZ Gardener have teamed up with Mr. Fothergills to colour the nation's gardens with delicate wild flowers that are easy to grow, are super little pollen producers and are well just simply bright and beautiful, even if you have to get down low to enjoy them. The packs contain around 350 seeds including calendula, cosmos, coreopsis, dianthus, nigella and many more varieties.

I don't have much space in my garden, but scatter the seed where I can find small patches in beds with sunshine and as long as I keep it watered, in next to no time, the delicate spindly green growth peeps up and within a couple of months, blooms appear. Only thing is, is that it requires a little planning and does not offer the reward of instant gratification that seedlings can provide.


So join me and help feed the bees by sewing some wild flower seeds in the southern hemisphere spring. 

And of course, the advantage of attracting bees, is that the butterflies will fly by too! Happy seed sewing.

- Claudia x


Tuesday 18 August 2015

Frank giveaway & #the_paper_series winner?

Well, it was my turn to be at the judging end of the competition with Frank this month and I must say it wasn't easy. So I decided to set some criteria and yay have selected a winning entry.

I have chosen @wendypaulamuses as the winner and this is why.


Wendy went all the way with the paper theme- upcycling an old book into a tent! And such a lovely vintage-style tent too, with flag and fancy tent top to boot. The flag seems to be blowing in the wind and you can almost hear the circus music!

As for the photo - I love the casualness of the composition. It’s as if Wendy is saying " ta da, just finished -  what do you think?" And the tones are a calming palette too, that go with the vintage theme.

Well done Wendy! I appreciate your efforts to make this lovely creation from flat pieces of paper- so creative! You are the winner of this lovely journal from Frank Stationery


There were also so many other imaginative entries and each had something special about them. But of course there are a special few I'd like to mention.

These colourful entries by:

@englishgirl14 with such a beautiful array of colourful stamps 


@_thelucky44_  whose colourful paint box and hand decorated stationery grabbed my attention


And below some carefully composed vignettes with clever compositions, item combinations and tones:

@24cherrys - a mysterious and moody vignette


@simmykins - a modern flatlay with gentle colours


And finally cannot leave out these talented and skilled artists:

@fourcornersdeign - a master (or should that be mistress!)  of storytelling!


@hellolaurajane whose skill and patience to cut out these intricate and lovely shapes is admirable!


@thestoyofvintage handmade vivid lapis lazuli journal project with a bird theme, which I am just a little partial towards!


Thanks for playing along – it’s always so exhilarating to see what ideas people come up with. 

Thanks also to Frank for the lovely prize. So great to collaborate with a team who are socially conscious and give back to society! 

Till next time – Claudia x


Friday 7 August 2015

Frank & the potential of the pencil

In this fast changing digital world, we forget about one of the greatest technological marvels invented - the humble pencil. Such a simple tool that helps us to learn, dream, design, remember. So how exciting this month to be collaborating with a New Zealand based online stationery company Frank that not only has beautiful and simply crafted products, but is ethically conscious.

Run by the couple, Jess and Jason Holdaway, the Frank brand is ‘Frank Socially Conscious Stationery’. Jason and Jess believe that everyone deserves an education and want to do their bit to ‘disrupt the poverty cycle’.  With every purchase, they give back to those struggling with poverty and so for every piece of stationery you buy, Frank will give away the equivalent to those in need. 

Read more about their admirable business philosophy in their branding profile and watch this video to see how customers have helped them help others.  

For stockists of Frank products around New Zealand visit 
http://www.frankstationery.com/pages/stockists or if based overseas, simply order online .


Frank have generously donated this month’s prize for the Instagram photo challenge which is this lovely  XO notebook. Filled with inspirational quotes and with 150 plus pages to fill, it will make you want to fall in love with writing again.  

To be in to win this lovely journal, enter the @adi&bert challenge on Instagram. 
The theme for this month's challenge is inspired by Frank and is all about that other amazing technology – P A P E R! 


Entry details:
1. Follow @frankstationery & @adiandbert
2. Tag a friend & invite to join
3. Post a NEW pic featuring a paper theme to #the_paper_series
Comp is open worldwide  and closes Sunday 16 August. As Jess and Jason are so busy having to fill double orders with every single purchase, I will judge this month's winning entry.

So do get clicking and join in the fun of #the_paper_series

- Claudia x